步骤
1.引入java代码优化库lombok,优化臃肿的代码
2.使用SwaggerUI生成接口文档
3.使用idea的easycode快速生成代码
4.springboot配合idea开启热部署
lombok
简介
ombok可以通过简单的注解的形式来帮助我们简化和消除一些必须有但显得很臃肿的Java代码,比如常见的Getter&Setter、toString()、构造函数等等。lombok不仅方便编写,同时也让我们的代码更简洁。
lombok提供了一个功能完整的jar包,可以很方便的与我们的项目进行集成。
官网: https://projectlombok.org/
简单的实践
最直观的一个例子
一个简单的用户模型
1
2
3
4
5
6
7
8
9
10
11
12
13
14
15
16
17
18
19
20
21
22
23
24
25
26
27
28
29
30
31
32
| public class User {
private String username;
private String password;
private String Jurisdiction;
public String getUsername() {
return username;
}
public void setUsername(String username) {
this.username = username;
}
public String getPassword() {
return password;
}
public void setPassword(String password) {
this.password = password;
}
public String getJurisdiction() {
return Jurisdiction;
}
public void setJurisdiction(String jurisdiction) {
Jurisdiction = jurisdiction;
}
}
|
使用lombok进行简化
简化后

常用的注解:
@Setter 注解在类或字段,注解在类时为所有字段生成setter方法,注解在字段上时只为该字段生成setter方法。
@Getter 使用方法同上,区别在于生成的是getter方法。
@ToString 注解在类,添加toString方法。
@EqualsAndHashCode 注解在类,生成hashCode和equals方法。
@NoArgsConstructor 注解在类,生成无参的构造方法。
@RequiredArgsConstructor 注解在类,为类中需要特殊处理的字段生成构造方法,比如final和被@NonNull注解的字段。
@AllArgsConstructor 注解在类,生成包含类中所有字段的构造方法。
@Data 注解在类,生成setter/getter、equals、canEqual、hashCode、toString方法,如为final属性,则不会为该属性生成setter方法。
@Slf4j 注解在类,生成log变量,严格意义来说是常量。private static final Logger log = LoggerFactory.getLogger(UserController.class);
其他的我就不一一举例子
关于安装 以及更详细的例子
https://blog.csdn.net/qq3399013670/article/details/81948737
高级一些的例子 :微信公众号文章 https://mp.weixin.qq.com/s/xNNdw6SIz91e9xDdLRd9zw
使用SwaggerUI生成接口文档
我自己负责的项目就时常让我头疼 因为功能迭代的非常庞大,接口文档虽然已经写好,但说实话我自己都看不懂,艰涩难懂说着就是这把。。
引入口文档生成框架:Swagger-UI
官网 https://swagger.io/tools/swagger-ui/
这里我是直接使用大神的开源框架的例子
项目地址 https://gitee.com/y_project/RuoYi
SwaggerUI的界面
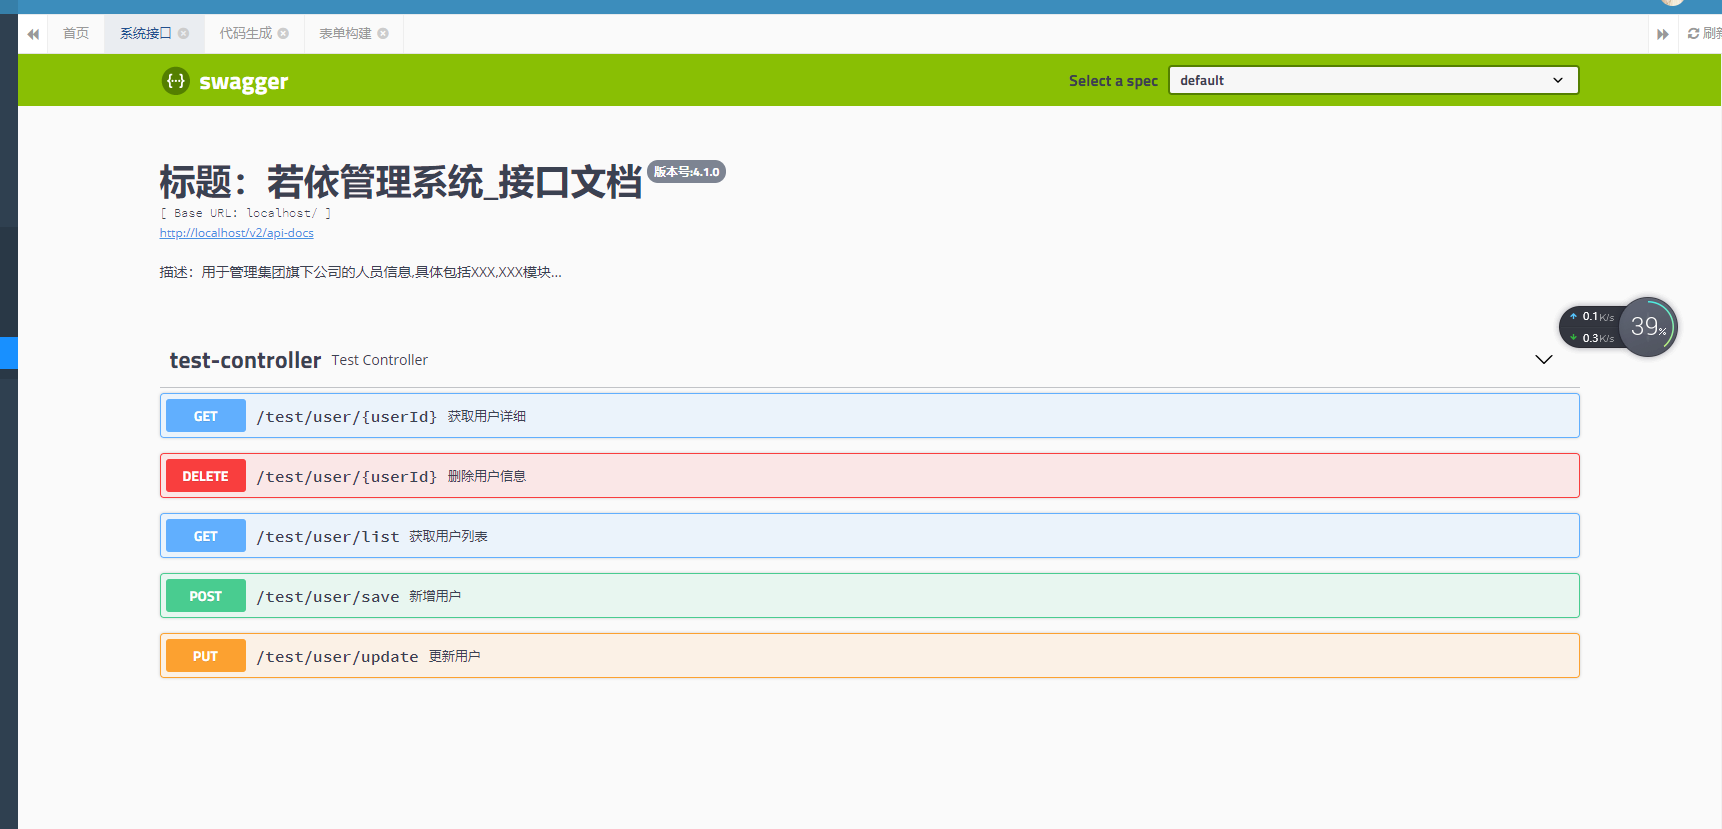

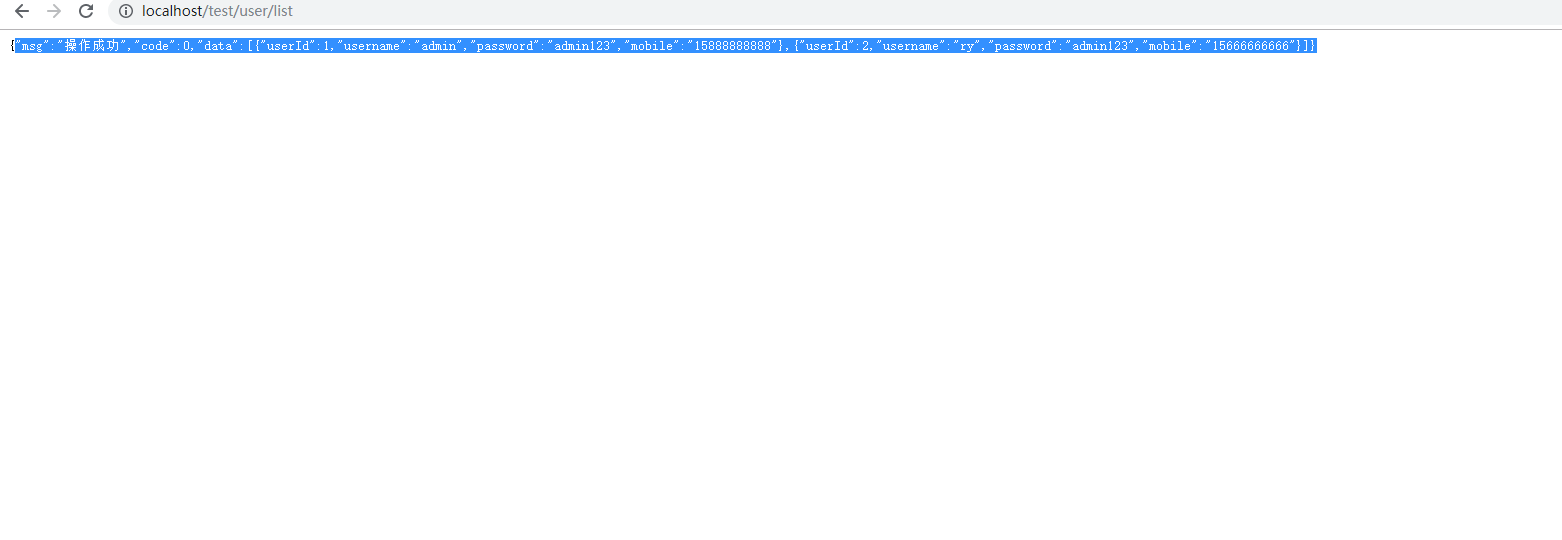
这个获得用户列表
源代码:
1
2
3
4
5
6
7
8
9
10
11
12
13
14
15
16
17
18
19
20
21
22
23
24
25
26
27
28
29
30
31
32
33
34
35
36
37
38
39
40
41
42
43
44
45
46
47
48
49
50
51
52
53
54
55
56
57
58
59
60
61
62
63
64
65
66
67
68
69
70
71
72
73
74
75
76
77
78
79
80
81
82
83
84
85
86
87
88
89
90
91
92
93
94
95
96
97
98
99
100
101
102
103
104
105
106
107
108
109
110
111
112
113
114
115
116
117
118
119
120
121
122
123
124
125
126
127
128
129
130
131
132
133
134
135
136
137
138
139
140
141
142
143
144
145
146
147
148
149
150
151
152
153
154
155
156
157
158
159
160
161
162
163
164
165
166
167
168
169
170
171
172
173
174
175
176
| package com.ruoyi.web.controller.tool;
import java.util.ArrayList;
import java.util.LinkedHashMap;
import java.util.List;
import java.util.Map;
import org.springframework.web.bind.annotation.DeleteMapping;
import org.springframework.web.bind.annotation.GetMapping;
import org.springframework.web.bind.annotation.PathVariable;
import org.springframework.web.bind.annotation.PostMapping;
import org.springframework.web.bind.annotation.PutMapping;
import org.springframework.web.bind.annotation.RequestMapping;
import org.springframework.web.bind.annotation.RestController;
import com.ruoyi.common.core.controller.BaseController;
import com.ruoyi.common.core.domain.AjaxResult;
import com.ruoyi.common.utils.StringUtils;
import io.swagger.annotations.Api;
import io.swagger.annotations.ApiImplicitParam;
import io.swagger.annotations.ApiModel;
import io.swagger.annotations.ApiModelProperty;
import io.swagger.annotations.ApiOperation;
@Api("用户信息管理")
@RestController
@RequestMapping("/test/user")
public class TestController extends BaseController
{
private final static Map<Integer, UserEntity> users = new LinkedHashMap<Integer, UserEntity>();
{
users.put(1, new UserEntity(1, "admin", "admin123", "15888888888"));
users.put(2, new UserEntity(2, "ry", "admin123", "15666666666"));
}
@ApiOperation("获取用户列表")
@GetMapping("/list")
public AjaxResult userList()
{
List<UserEntity> userList = new ArrayList<UserEntity>(users.values());
return AjaxResult.success(userList);
}
@ApiOperation("获取用户详细")
@ApiImplicitParam(name = "userId", value = "用户ID", required = true, dataType = "int", paramType = "path")
@GetMapping("/{userId}")
public AjaxResult getUser(@PathVariable Integer userId)
{
if (!users.isEmpty() && users.containsKey(userId))
{
return AjaxResult.success(users.get(userId));
}
else
{
return error("用户不存在");
}
}
@ApiOperation("新增用户")
@ApiImplicitParam(name = "userEntity", value = "新增用户信息", dataType = "UserEntity")
@PostMapping("/save")
public AjaxResult save(UserEntity user)
{
if (StringUtils.isNull(user) || StringUtils.isNull(user.getUserId()))
{
return error("用户ID不能为空");
}
return AjaxResult.success(users.put(user.getUserId(), user));
}
@ApiOperation("更新用户")
@ApiImplicitParam(name = "userEntity", value = "新增用户信息", dataType = "UserEntity")
@PutMapping("/update")
public AjaxResult update(UserEntity user)
{
if (StringUtils.isNull(user) || StringUtils.isNull(user.getUserId()))
{
return error("用户ID不能为空");
}
if (users.isEmpty() || !users.containsKey(user.getUserId()))
{
return error("用户不存在");
}
users.remove(user.getUserId());
return AjaxResult.success(users.put(user.getUserId(), user));
}
@ApiOperation("删除用户信息")
@ApiImplicitParam(name = "userId", value = "用户ID", required = true, dataType = "int", paramType = "path")
@DeleteMapping("/{userId}")
public AjaxResult delete(@PathVariable Integer userId)
{
if (!users.isEmpty() && users.containsKey(userId))
{
users.remove(userId);
return success();
}
else
{
return error("用户不存在");
}
}
}
@ApiModel("用户实体")
class UserEntity
{
@ApiModelProperty("用户ID")
private Integer userId;
@ApiModelProperty("用户名称")
private String username;
@ApiModelProperty("用户密码")
private String password;
@ApiModelProperty("用户手机")
private String mobile;
public UserEntity()
{
}
public UserEntity(Integer userId, String username, String password, String mobile)
{
this.userId = userId;
this.username = username;
this.password = password;
this.mobile = mobile;
}
public Integer getUserId()
{
return userId;
}
public void setUserId(Integer userId)
{
this.userId = userId;
}
public String getUsername()
{
return username;
}
public void setUsername(String username)
{
this.username = username;
}
public String getPassword()
{
return password;
}
public void setPassword(String password)
{
this.password = password;
}
public String getMobile()
{
return mobile;
}
public void setMobile(String mobile)
{
this.mobile = mobile;
}
}
|
jar依赖引入
1
2
3
4
5
6
7
8
9
10
11
12
13
14
15
16
17
18
19
20
21
22
23
24
|
<dependency>
<groupId>io.springfox</groupId>
<artifactId>springfox-swagger2</artifactId>
<version>${swagger.version}</version>
<exclusions>
<exclusion>
<groupId>io.swagger</groupId>
<artifactId>swagger-annotations</artifactId>
</exclusion>
<exclusion>
<groupId>io.swagger</groupId>
<artifactId>swagger-models</artifactId>
</exclusion>
</exclusions>
</dependency>
<dependency>
<groupId>io.springfox</groupId>
<artifactId>springfox-swagger-ui</artifactId>
<version>${swagger.version}</version>
</dependency>
|
idea的easycode
这里我也是照着教程很轻松实现了
直接看大佬的文章吧
https://mp.weixin.qq.com/s/XM01T0ZZRuhRXLaTWnQ5Nw
idea+springboot 热部署
首先是springboot pom文件引用组件
1
2
3
4
5
6
7
8
9
10
11
12
13
14
15
16
17
18
19
|
<dependency>
<groupId>
org.springframework.boot
</groupId>
<artifactId>
spring-boot-devtools
</artifactId>
<optional>
true
</optional>
</dependency>
|
然后是idea的开启
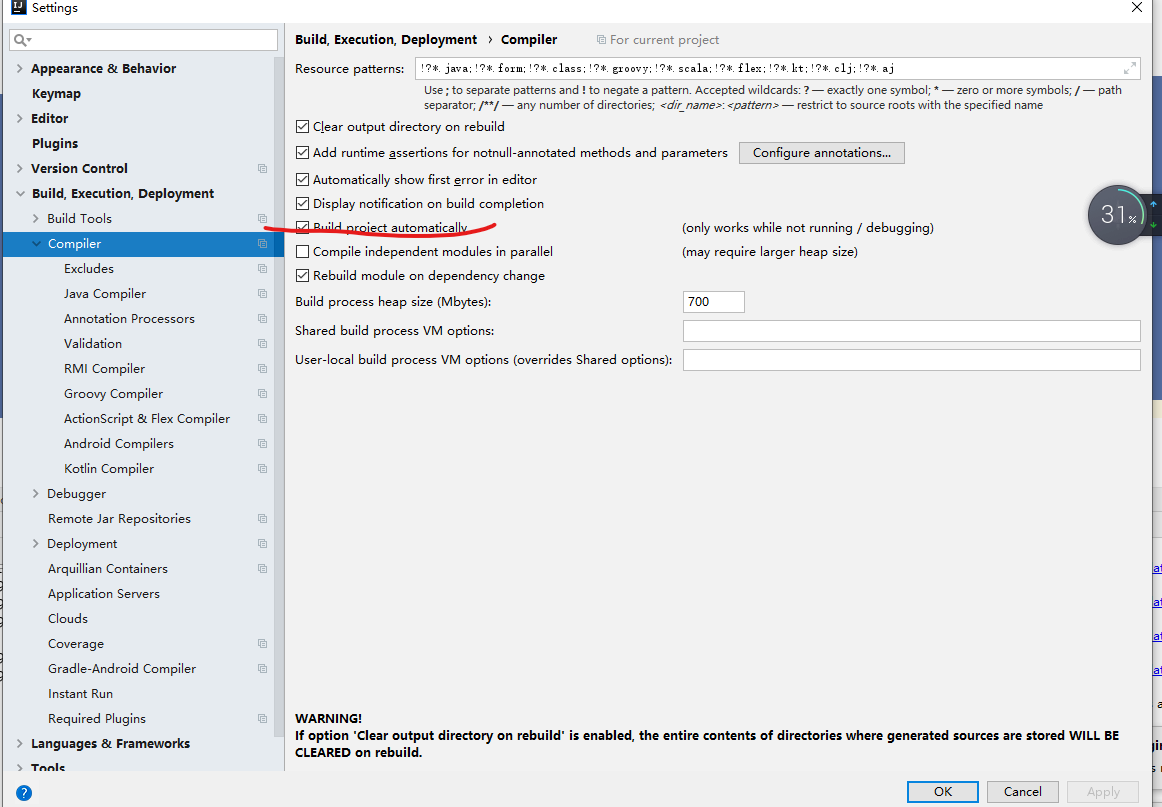
Ctrl+Shift+Alt+/ 选择Registry 找到这三项如此配置

修改项目启动的加载方式
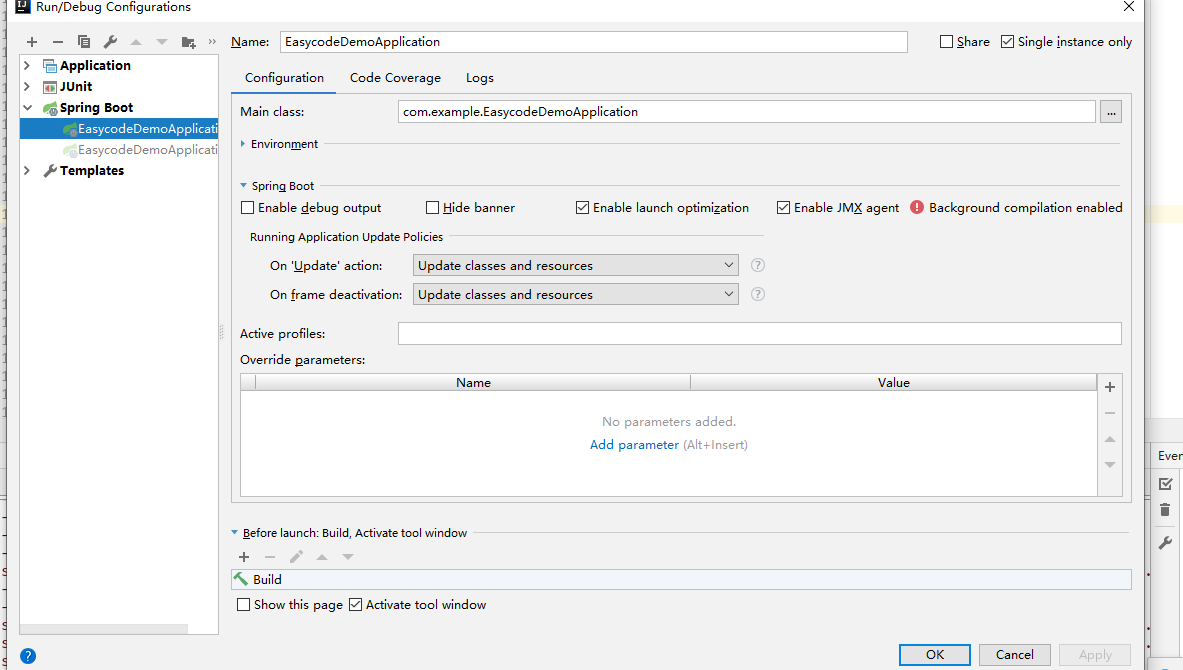
ok 直接运行时修改类去验证修改结果