以下所有都是从某大佬翻译的netty开发文档借鉴过来的https://waylau.gitbooks.io/netty-4-user-guide
写个抛弃服务器 1 2 3 4 5 6 7 8 9 10 11 12 13 14 15 16 17 18 19 20 21 22 23 24 25 26 27 28 29 30 31 32 33 34 35 36 37 38 39 40 41 42 43 44 45 46 47 48 49 50 51 52 53 54 55 56 57 58 59 60 61 62 63 64 65 66 67 68 69 70 import io.netty.bootstrap.ServerBootstrap;import io.netty.channel.ChannelFuture;import io.netty.channel.ChannelInitializer;import io.netty.channel.ChannelOption;import io.netty.channel.EventLoopGroup;import io.netty.channel.nio.NioEventLoopGroup;import io.netty.channel.socket.SocketChannel;import io.netty.channel.socket.nio.NioServerSocketChannel;public class DiscardServer private int port;public DiscardServer (int port) this .port = port;public void run () throws Exception new NioEventLoopGroup(); new NioEventLoopGroup();try {new ServerBootstrap(); new ChannelInitializer<SocketChannel>() { @Override public void initChannel (SocketChannel ch) throws Exception new DiscardServerHandler());128 ) true ); finally {public static void main (String[] args) throws Exception int port;if (args.length > 0 ) {0 ]);else {8080 ;new DiscardServer(port).run();1. NioEventLoopGroup 是用来处理I/O操作的多线程事件循环器,Netty 提供了许多不同的 EventLoopGroup 的实现用来处理不同的传输。在这个例子中我们实现了一个服务端的应用,因此会有2 个 NioEventLoopGroup 会被使用。第一个经常被叫做‘boss’,用来接收进来的连接。第二个经常被叫做‘worker’,用来处理已经被接收的连接,一旦‘boss’接收到连接,就会把连接信息注册到‘worker’上。如何知道多少个线程已经被使用,如何映射到已经创建的 Channel上都需要依赖于 EventLoopGroup 的实现,并且可以通过构造函数来配置他们的关系。2. ServerBootstrap 是一个启动 NIO 服务的辅助启动类。你可以在这个服务中直接使用 Channel,但是这会是一个复杂的处理过程,在很多情况下你并不需要这样做。3. 这里我们指定使用 NioServerSocketChannel 类来举例说明一个新的 Channel 如何接收进来的连接。4. 这里的事件处理类经常会被用来处理一个最近的已经接收的 Channel。ChannelInitializer 是一个特殊的处理类,他的目的是帮助使用者配置一个新的 Channel。也许你想通过增加一些处理类比如DiscardServerHandler 来配置一个新的 Channel 或者其对应的ChannelPipeline 来实现你的网络程序。当你的程序变的复杂时,可能你会增加更多的处理类到 pipline 上,然后提取这些匿名类到最顶层的类上。5. 你可以设置这里指定的 Channel 实现的配置参数。我们正在写一个TCP/IP 的服务端,因此我们被允许设置 socket 的参数选项比如tcpNoDelay 和 keepAlive。请参考 ChannelOption 和详细的 ChannelConfig 实现的接口文档以此可以对ChannelOption 的有一个大概的认识。6. 你关注过 option() 和 childOption() 吗?option() 是提供给NioServerSocketChannel 用来接收进来的连接。childOption() 是提供给由父管道 ServerChannel 接收到的连接,在这个例子中也是 NioServerSocketChannel。7. 我们继续,剩下的就是绑定端口然后启动服务。这里我们在机器上绑定了机器所有网卡上的 8080 端口。当然现在你可以多次调用 bind() 方法(基于不同绑定地址)。
服务端DiscardServerHandler
1
2
3
4
5
6
7
8
9
10
11
12
13
14
15
16
17
18
19
20
21
22
23
24
25
26
27
28
29
import io.netty.buffer.ByteBuf;import io.netty.channel.ChannelHandlerContext;import io.netty.channel.ChannelInboundHandlerAdapter;import java.text.SimpleDateFormat;import java.util.Date;public class DiscardServerHandler extends ChannelInboundHandlerAdapter @Override public void channelRead (ChannelHandlerContext ctx, Object msg) new SimpleDateFormat("YYYY-MM-dd HH-mm-ss" ).format(new Date());"接收了" );@Override public void exceptionCaught (ChannelHandlerContext ctx, Throwable cause)
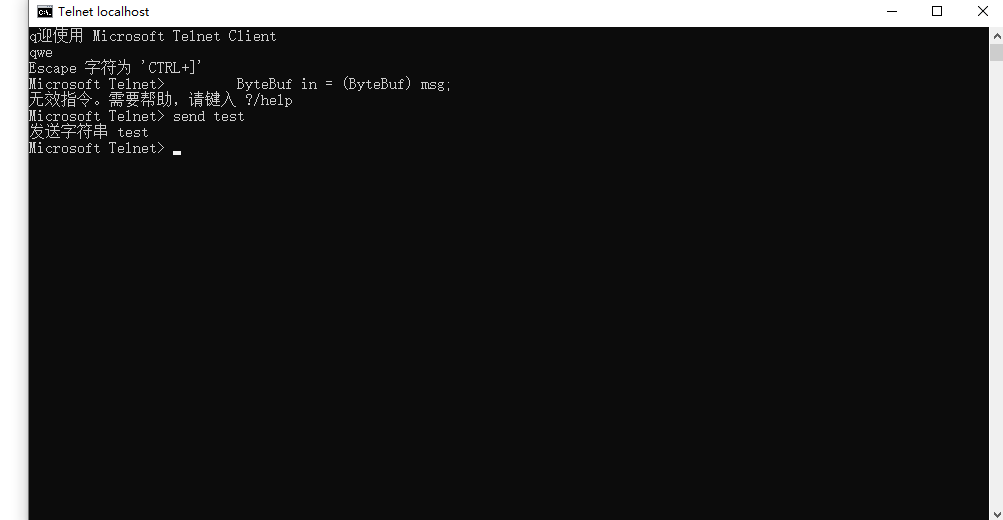
启动windows的telnet localhost 8080
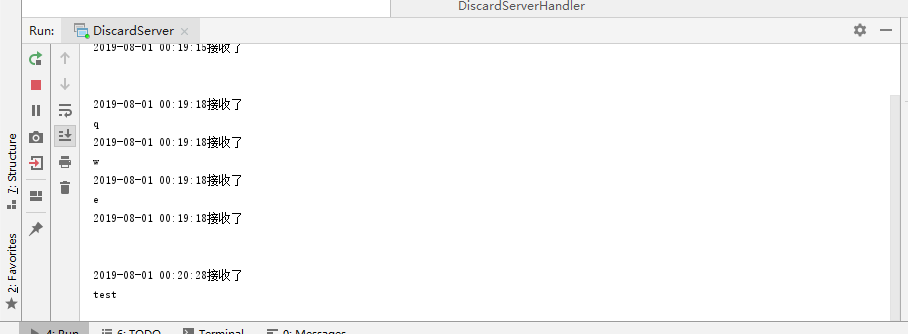
查看执行结果
查看客户端发送过来的数据 将DiscardServerHandler的channelRead()方法改写一下
1
2
3
4
5
6
7
8
9
10
11
12
13
14
@Override public void channelRead (ChannelHandlerContext ctx, Object msg) try {while (in.isReadable()) { new SimpleDateFormat("YYYY-MM-dd HH:mm:ss" ).format(new Date());"接收了" );char ) in.readByte());finally {
将上面循环简化
1
2
3
4
5
6
7
8
9
10
@Override public void channelRead (ChannelHandlerContext ctx, Object msg) new SimpleDateFormat("YYYY-MM-dd HH:mm:ss" ).format(new Date());"接收了" );
打开telnet ip port 使用ctrl +] 进入命令模式
send test 发送字符串
服务端打印
写一个应答服务器 已知消息都是在DiscardServerHandler的channelRead()方法处理的应答也是再次 将方法改写 使用ChannelHandlerContext对象的方法进行发送
1
2
3
4
5
6
7
@Override public void channelRead (ChannelHandlerContext ctx, Object msg) 1. ChannelHandlerContext 对象提供了许多操作,使你能够触发各种各样的 I/O 事件和操作。这里我们调用了 write(Object) 方法来逐字地把接受到的消息写入。请注意不同于 DISCARD 的例子我们并没有释放接受到的消息,这是因为当写入的时候 Netty 已经帮我们释放了。2. ctx.write(Object) 方法不会使消息写入到通道上,他被缓冲在了内部,你需要调用 ctx.flush() 方法来把缓冲区中数据强行输出。或者你可以用更简洁的 cxt.writeAndFlush(msg) 以达到同样的目的。
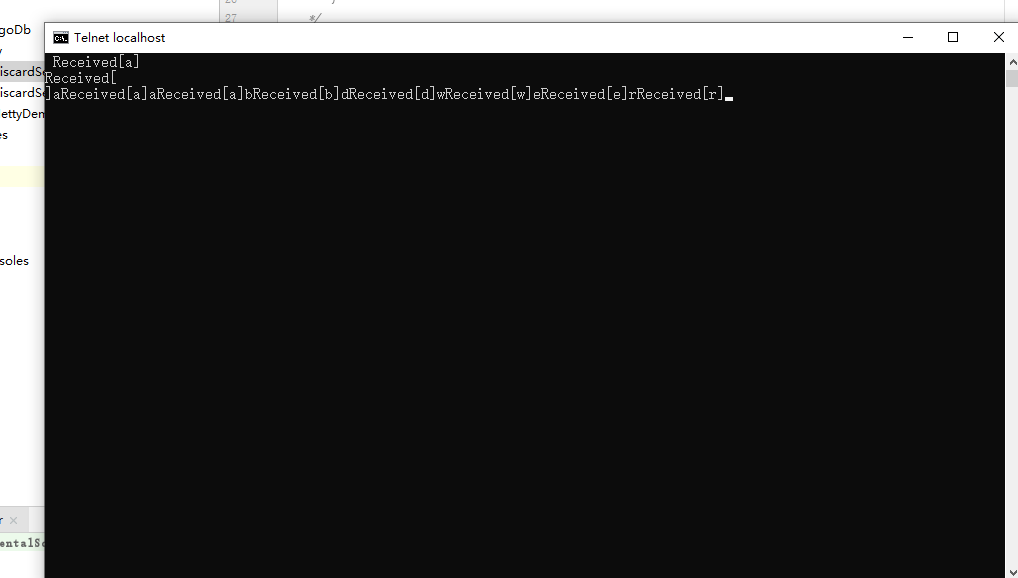
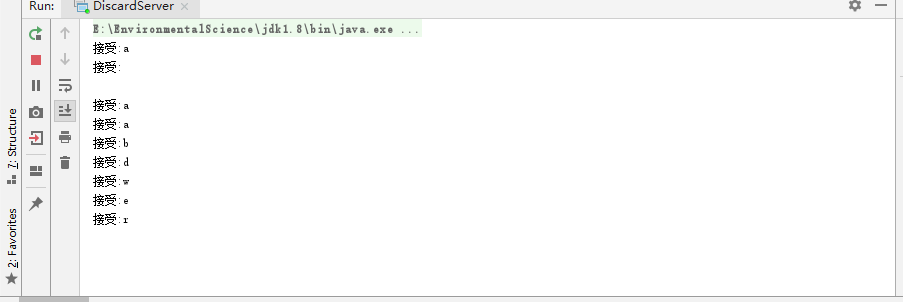
改写:
1 2 3 4 5 6 7 8 9 10 public voidchannelRead (ChannelHandlerContext ctx, Object msg) "接受:" +receive);"Received[" + receive + "]" ).getBytes()));
这个方法会将接受到的消息打印到控制台,并向客户端telnet回应
写一个时间服务器 作用客户端启动时向服务端发送一个时间
客户端启动类
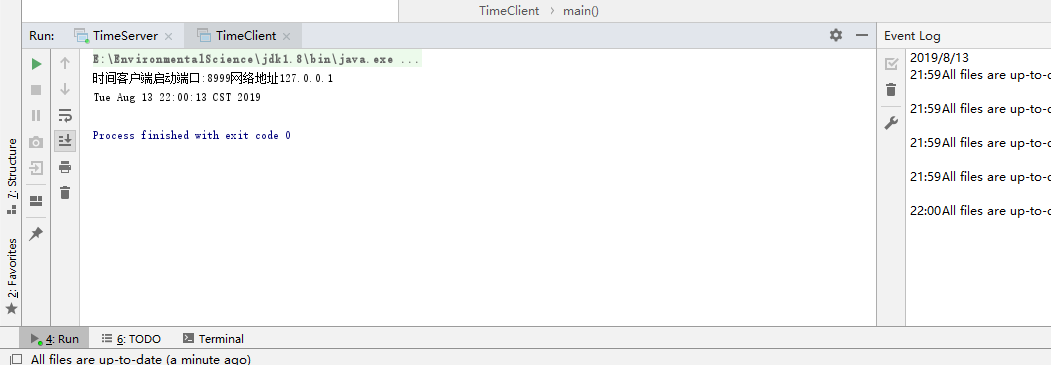
1
2
3
4
5
6
7
8
9
10
11
12
13
14
15
16
17
18
19
20
21
22
23
24
25
26
27
28
29
30
31
32
33
34
35
36
37
38
39
40
41
42
43
44
45
package Netty;import io.netty.bootstrap.Bootstrap;import io.netty.channel.ChannelFuture;import io.netty.channel.ChannelInitializer;import io.netty.channel.ChannelOption;import io.netty.channel.EventLoopGroup;import io.netty.channel.nio.NioEventLoopGroup;import io.netty.channel.socket.SocketChannel;import io.netty.channel.socket.nio.NioSocketChannel;public class TimeClient public static void main (String[] args) throws Exception 0 ];int port = Integer.parseInt(args[1 ]);new NioEventLoopGroup();try {new Bootstrap(); final Bootstrap channel = b.channel(NioSocketChannel.class);true ); new ChannelInitializer<SocketChannel>() {@Override public void initChannel (SocketChannel ch) throws Exception new TimeClientHandler());"时间客户端启动端口:" +port+"网络地址" +host);finally {
TimeClientHandler
1
2
3
4
5
6
7
8
9
10
11
12
13
14
15
16
17
18
19
20
21
22
23
24
25
26
27
package Netty;import io.netty.buffer.ByteBuf;import io.netty.channel.ChannelHandlerContext;import io.netty.channel.ChannelInboundHandlerAdapter;import java.util.Date;public class TimeClientHandler extends ChannelInboundHandlerAdapter @Override public void channelRead (ChannelHandlerContext ctx, Object msg) try {long currentTimeMillis = (m.readUnsignedInt() - 2208988800L ) * 1000L ;new Date(currentTimeMillis));finally {@Override public void exceptionCaught (ChannelHandlerContext ctx, Throwable cause)
服务端
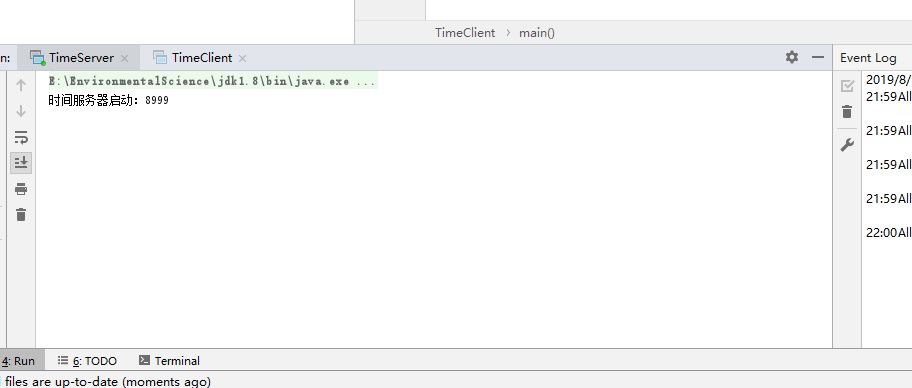
1
2
3
4
5
6
7
8
9
10
11
12
13
14
15
16
17
18
19
20
21
22
23
24
25
26
27
28
29
30
31
32
33
34
35
36
37
38
39
40
41
42
43
44
45
46
47
48
49
50
51
52
53
54
55
56
57
58
59
package Netty;import io.netty.bootstrap.ServerBootstrap;import io.netty.channel.ChannelFuture;import io.netty.channel.ChannelInitializer;import io.netty.channel.ChannelOption;import io.netty.channel.EventLoopGroup;import io.netty.channel.nio.NioEventLoopGroup;import io.netty.channel.socket.SocketChannel;import io.netty.channel.socket.nio.NioServerSocketChannel;public class TimeServer private int port;public TimeServer (int port) this .port = port;public void run () throws Exception "时间服务器启动:" +port);new NioEventLoopGroup(); new NioEventLoopGroup();try {new ServerBootstrap(); new ChannelInitializer<SocketChannel>() { @Override public void initChannel (SocketChannel ch) throws Exception new TimeServerHandler());128 ) true ); finally {public static void main (String[] args) throws Exception int port;if (args.length > 0 ) {0 ]);else {2222 ;new TimeServer(port).run();
TimeServerHandler
1
2
3
4
5
6
7
8
9
10
11
12
13
14
15
16
17
18
19
20
21
22
23
24
25
26
27
28
29
30
31
32
33
34
35
36
37
38
39
40
41
42
43
44
45
46
47
package Netty;import io.netty.buffer.ByteBuf;import io.netty.buffer.Unpooled;import io.netty.channel.ChannelFuture;import io.netty.channel.ChannelFutureListener;import io.netty.channel.ChannelHandlerContext;import io.netty.channel.ChannelInboundHandlerAdapter;import io.netty.util.CharsetUtil;public class TimeServerHandler extends ChannelInboundHandlerAdapter @Override public void channelActive (final ChannelHandlerContext ctx) final ByteBuf time = ctx.alloc().buffer(4 ); int ) (System.currentTimeMillis() / 1000L + 2208988800L ));final ChannelFuture f = ctx.writeAndFlush(time); new ChannelFutureListener() {public void operationComplete (ChannelFuture future) assert f == future;@Override public void exceptionCaught (ChannelHandlerContext ctx, Throwable cause)
先启动服务端,在启动客户端看下效果
搞定1
处理一个基于流的传输 关于问题所在:
基于流的传输比如 TCP/IP, 接收到数据是存在 socket 接收的 buffer 中。不幸的是,基于流的传输并不是一个数据包队列,而是一个字节队列 。意味着,即使你发送了2个独立的数据包,操作系统也不会作为2个消息处理而仅仅是作为一连串的字节而言 。因此这是不能保证你远程写入的数据就会准确地读取。
基础解决
1
2
3
4
5
6
7
8
9
10
11
12
13
14
15
16
17
18
19
20
21
22
23
24
25
26
27
28
29
30
31
32
33
public class TimeClientHandler extends ChannelInboundHandlerAdapter private ByteBuf buf;@Override public void handlerAdded (ChannelHandlerContext ctx) 4 ); @Override public void handlerRemoved (ChannelHandlerContext ctx) null ;@Override public void channelRead (ChannelHandlerContext ctx, Object msg) if (buf.readableBytes() >= 4 ) { long currentTimeMillis = (buf.readUnsignedInt() - 2208988800L ) * 1000L ;new Date(currentTimeMillis));@Override public void exceptionCaught (ChannelHandlerContext ctx, Throwable cause)
上面这种解决只适用于4个字节的,如果是更加复杂的要增加多个 ChannelHandler 到ChannelPipeline
使用可拓展ByteToMessageDecoder 进行解决
1
2
3
4
5
6
7
8
9
10
public class TimeDecoder extends ByteToMessageDecoder @Override protected void decode (ChannelHandlerContext ctx, ByteBuf in, List<Object> out) if (in.readableBytes() < 4 ) {return ; 4 ));
得很简单。
2.每当有新数据接收的时候,ByteToMessageDecoder 都会调用 decode() 方法来处理内部的那个累积缓冲。
3.Decode() 方法可以决定当累积缓冲里没有足够数据时可以往 out 对象里放任意数据。当有更多的数据被接收了 ByteToMessageDecoder 会再一次调用 decode() 方法。
4.如果在 decode() 方法里增加了一个对象到 out 对象里,这意味着解码器解码消息成功。ByteToMessageDecoder 将会丢弃在累积缓冲里已经被读过的数据。请记得你不需要对多条消息调用 decode(),ByteToMessageDecoder 会持续调用 decode() 直到不放任何数据到 out 里。
修改一下timeclien的代码
用POJO代替ByteBuf 1 2 3 4 5 6 7 8 9 10 11 12 13 14 15 16 17 18 19 20 21 public class UnixTime private final long value;public UnixTime () this (System.currentTimeMillis() / 1000L + 2208988800L );public UnixTime (long value) this .value = value;public long value () return value;@Override public String toString () return new Date((value() - 2208988800L ) * 1000L ).toString();
编码器的实现
1
2
3
4
5
6
public class TimeEncoder extends MessageToByteEncoder <UnixTime > @Override protected void encode (ChannelHandlerContext ctx, UnixTime msg, ByteBuf out) int )msg.value());
修改一下 TimeServerHandler 的代码。
1
2
3
4
5
@Override public void channelActive (ChannelHandlerContext ctx) new UnixTime());
修改解码器
1
2
3
4
5
6
@Override public void channelRead (ChannelHandlerContext ctx, Object msg)